
Facilitating


Apple Classroom App
Classroom is an app for iPad and Mac that helps teachers guide learning, share work, and manage student devices. Teachers can launch a specific app, website, or textbook page on any student’s iPad in the classroom. They can also send and receive documents with their class and share student work on a TV, monitor, or projector using Apple TV. Teachers can then see which apps students are working in, mute student devices, and reset a student’s password.
When Classroom is used with Shared iPad and Managed Apple IDs, teachers can assign students to a group of iPad devices. Students tap their name in a list on each iPad and enter their passcode at the beginning of class. When class is over, teachers can use Classroom to sign students out of their Shared iPad so that it’s ready for the next student. Data is cached locally on iPad and is pushed to the cloud even after students sign out. If necessary, data from the previous user continues to be pushed to the cloud after the next user signs in to the iPad.
For optimal performance with Classroom, class sizes of 60 students or fewer are recommended. Classroom can’t interact with more than 60 students in a single class. Classroom can also access up to 250 nearby iPad devices so that students on those devices can be assigned to use Shared iPad.
Classroom can be used for both admin-created and teacher-created classes.
Note: Student images are added on the MDM server for admin-created classes. The student is responsible for adding their image on their iPad for teacher-created classes.
Admin Created Classes
For admin-created classes, all iPad devices must be enrolled in your MDM solution and the MDM administrator must create sets of classes so Classroom has roster information. In your MDM solution, each class consists of a name, one or more teachers, students, and (optionally) groups of devices (when using Shared iPad). Classroom uses these classes to register which devices belong to students in each class. The classes configured by your MDM solution are also used to simplify the sign-in experience with Shared iPad. You can create temporary groups within these classes. For example, if three students are working on a project together, you can create a group just for them and then guide them to look at specific websites or ePubs that pertain to their project. You can create temporary groups without the need to contact your MDM administrator.
In a one-to-one environment, Classroom can still be used to keep students on task, letting the teacher guide the student experience. For more information about using Classroom with Shared iPad and in a one-to-one environment, see Classroom requirements for admin-created classes in Classroom Help.
Teacher Created Classes
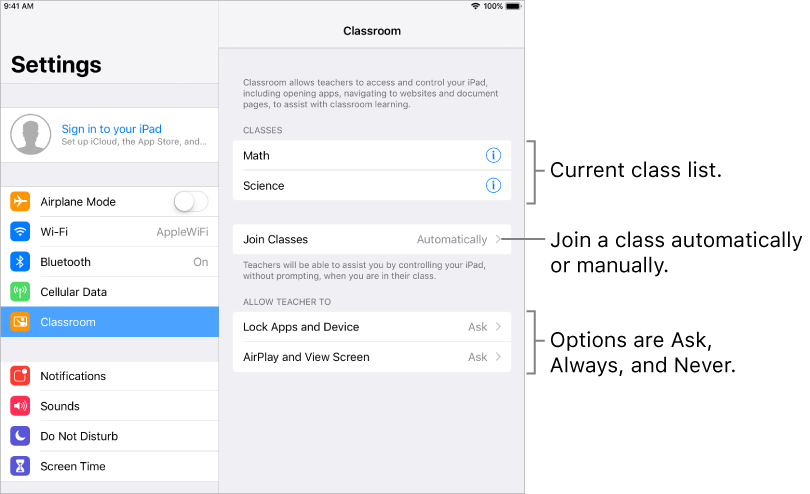
For teacher-created classes, no MDM solution is required, although integrating with one can change how the student iPad devices function in the classes. When teachers create a class, they make the class available for students to join. Teachers create teacher-created classes by entering their name and then creating the class. Provided that all network infrastructure requirements are met, the teacher can advertise a class for enrollment and a student can browse for that class by choosing Settings > Classroom on their iPad. Students add the class by entering a four-digit PIN (personal identification number) provided by the teacher. A student can add more than one class—by the same or different teachers. In this way, students can easily move from room to room with their iPad.
For more information on setting up teacher-created classes, see Set up a teacher-created class in Classroom Help.
Important: Teacher-created classes are incompatible with Shared iPad and the education configuration profile from your MDM solution that creates admin-created classes. If the education configuration profile is present on the teacher’s or student’s iPad, teacher-created classes can’t be created or joined.
View Options
There are specific settings that can be configured to allow or deny a student the ability to change whether their screen is able to be viewed by you. These settings are located in your mobile device management (MDM) solution and in the Classroom settings on the iPad. Consult your MDM solution on how they implemented Classroom restrictions.
USING CLASSROOM ON MAC TO CONTROL MACS
Classroom on Mac
Classroom is a powerful app for iPad and Mac that helps you guide learning, share work, and manage student devices. It supports both shared and one-to-one environments. You can launch an app, a website, or a textbook page on any iPad in the class, share documents with your students or display student work on a TV, monitor, or projector using Apple TV. You can even see which apps students are working in, mute student devices, assign a shared iPad to each student, and reset a student’s password. And when class ends, you can see a summary of your student's activities.
Before getting started.
Classroom is available in the Mac App Store and is easy to set up. You can create classes manually without IT support, or work with your school’s IT administrator to automatically configure Classroom with roster data for students and classes.
USING APPLE CLASSROOM
When a teacher uses Classroom on their iPad, they can perform actions on each student’s iPad in order to focus their attention and guide their learning. For example, they can do the following on any number of iPad devices at once:
Create a Group
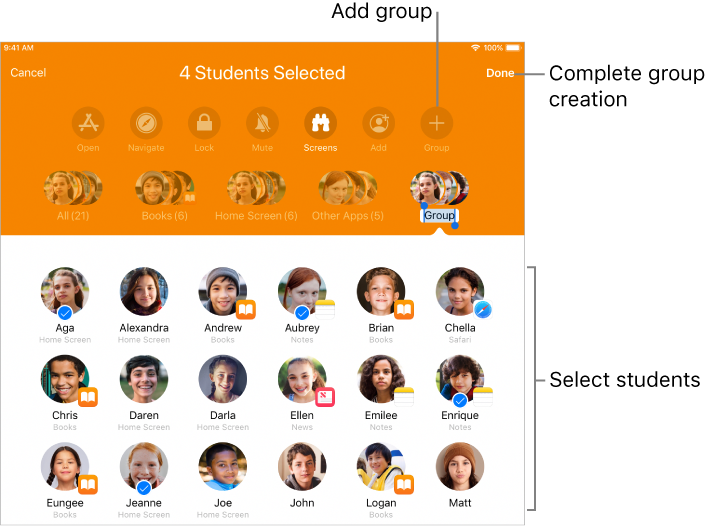
- In the row of actions, tap Group.
- Enter a name for the group.
- Tap the names of students who will be members of this group. A checkbox appears next to the students’ names, indicating they’re going to be part of this group.
- Tap Done in the upper right corner of the screen, then view the new group in the row of groups.
Note: If your iPad is in Split View, you can edit a group using the Group Edit button, under More.
To remove a group:
Press and hold a group you created, then tap Remove.
Open & Lock an App
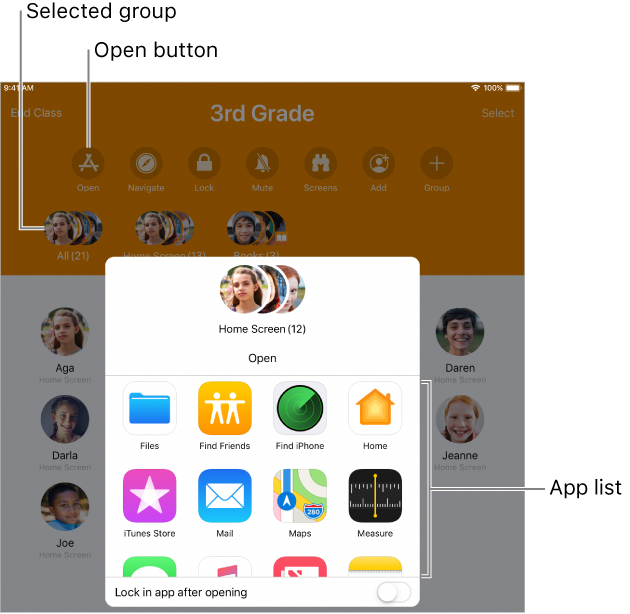
You can open an app on all the students’ iPad devices.
Note: You and the students must all have the app on your iPad devices.
- Do one of the following:
- Tap All.
- Tap a specific group.
- Use the “Create a group” task in the Organize your class section to manually create a group.
- In the row of actions, tap Open
 , then do one of the following to open that app on the iPad devices of all selected students:
- Tap an app in the list.
- Swipe down in the app list to reveal the Search bar and enter the name of the app, then tap the app.
You can also choose to open the app on your own iPad.
Lock an app open
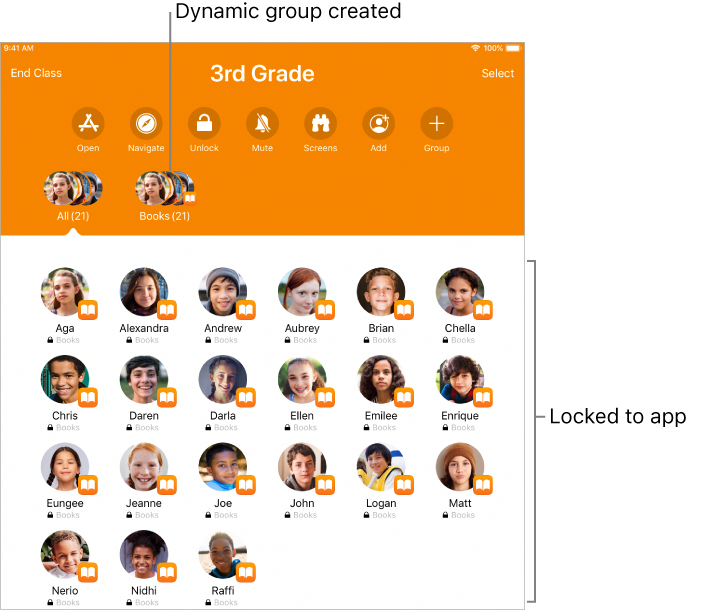
You can lock an app open on students’ iPad devices and prevent the students from closing the app or opening up any other app.
Note: You and the students must all have the app on your iPad devices.
- Do one of the following:
- Tap All.
- Tap a specific group.
- Use the “Create a group” task in Organize your class to manually create a group.
- In the row of actions, tap Open , then do one of the following to open that app on the iPad devices of all selected students.
- Scroll to locate the app in the list.
- Swipe down in the app list to reveal the Search bar, then enter the name of the app.
- Turn on “Lock in app after opening.”
- Tap to open the app.
You can also choose to open the app on your own iPad.
Close a Locked App
If you turned on “Lock in app after opening,” you must follow these steps to turn it off:
- Select the group that had “Lock in app after opening” turned on.
- In the row of actions, tap Lock to turn off “Lock in app after opening.”
Note: If you perform this task with a group in which some students have their iPad devices locked, their screens will become unlocked.
If you forget to unlock an iPad or an app locked to the screen, it unlocks automatically when out of Bluetooth range or after 20 seconds of no connectivity.
Open a webpage, ePub book or chapter, or iTunes U course
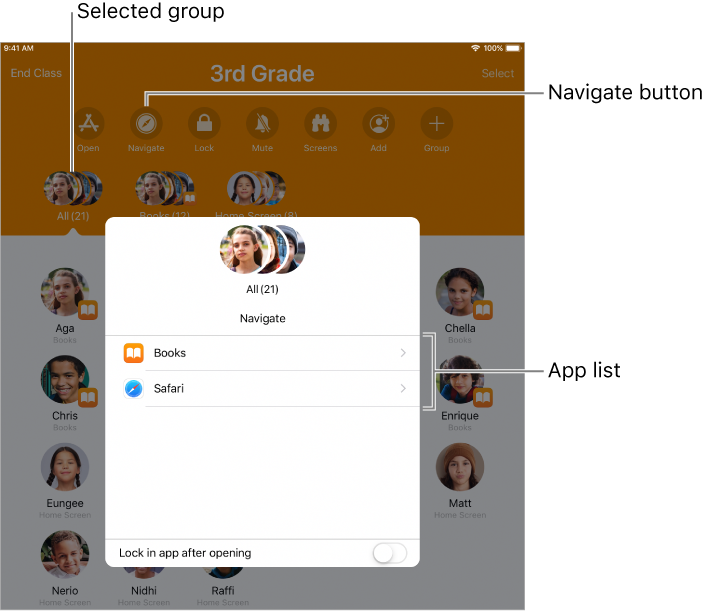
You can navigate to, and share with students, a webpage using its bookmark, a chapter in an EPUB book, an iTunes U course, or a PDF.
Note: You and the students must all have the same EPUB book, PDF, or iTunes U course on your iPad devices. For iTunes U courses, the iTunes U app must be version 3.3 or later.
- Do one of the following:
- Tap All.
- Tap a specific group.
- Use the “Create a group” task in Organize your class to manually create a group.
- In the row of actions, tap
 Navigate.
 - Do one of the following:
- Tap Safari, then locate the bookmark you want the students to view.
- Tap the Books app, then locate the EPUB book, EPUB chapter, or PDF you want the students to view.
- Tap iTunes U, then locate the course you want the students to view.
- Tap the bookmark, EPUB book, EPUB chapter, PDF, or iTunes U course to open it on the iPad devices of the selected students.
Mute an iPad
You can mute an iPad for one or all students. This sets the volume to zero. The student can then manually increase the volume again if desired.
Note: This action decreases the volume for media only. System sounds and alerts can still be heard.
- Do one of the following:
- Tap All.
- Tap a specific group.
- Use the “Create a group” task in Organize your class to manually create a group.
- In the row of actions, tap
 mute to mute the iPad for each student.
Share Links & Documents
Share a Webpage. You can share a webpage with students directly from Safari.
Navigate to the webpage in Safari, tap  Share , then tap the class name to share the webpage with one or more students.
Share a Document. You can also share a document from an app. For example, you can share a document from the Pages app.
- Do one of the following:
- If the document is open: Tap More
 , then tap Send a Copy.
 - If the document is closed: Tap Share in the document manager, tap Send a Copy, then tap the document.
- If the document is open: Tap More
- Tap a format (Pages, PDF, Word, or EPUB).
If you’re not sure whether your recipient has Pages or Word, choose PDF. Recipients can open and read a PDF but not make changes to it.
From the AirDrop row, tap your class from the list.
View an iPad screen
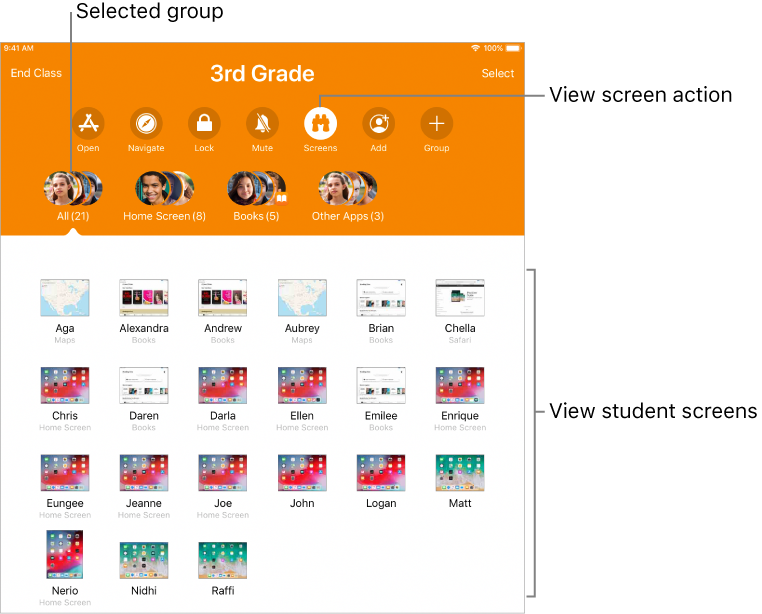
Note: Depending on how your mobile device management (MDM) is configured, you may not be able to perform this task.
- Do one of the following:
- Tap All.
- Tap a specific group.
- Use the “Create a group” task in Organize your class to manually create a group.
In the row of actions, tap Screens ![]() .
.
View Shared Items from Students
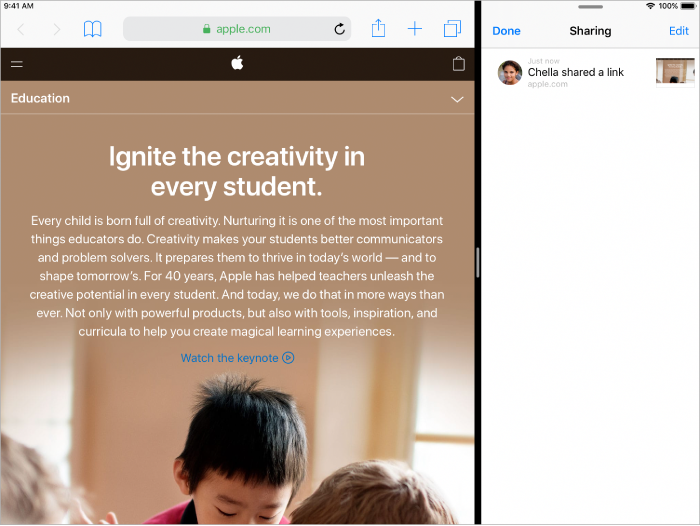
Students can share webpages and documents with you. They simply select the page or document and tap the Share button, then select you from the share list. Once they share the item with you, a Share Box appears on the right in the row of actions. The number in the box varies depending on the items shared from your students.
- In the row of actions, tap Share Box .
- View the shared items, then select one to view the page.
Tip: Use Slide Over on the iPad to view both the list of shared items and the actual webpage or document:
Administrative Tasks (Shared iPads)
Teacher’s can also do the following administrative tasks, which require Shared iPad and student Managed Apple IDs:
- Assign iPad.
- Sign out students.
- Reset a student’s password (one student at a time, requires only Managed Apple IDs).
Reaching All Learners
Teachers can use Classroom to find the students who are struggling to keep on task or complete assignments.
Handling Information
Cleaning Clean iPad immediately if it comes in contact with anything that may cause stains or other damage—for example, dirt or sand, ink, makeup, soap, detergent, acids or acidic foods, and lotions. To clean:
- Disconnect all cables and turn iPad off (press and hold the Sleep/Wake button, then drag the slider).
- Use a soft, slightly damp, lint-free cloth—for example, a lens cloth.
- Avoid getting moisture in openings.
- Don’t use cleaning products or compressed air.
The front of iPad is made of glass with a fingerprint-resistant oleophobic (oil-repellant) coating. This coating wears over time with normal usage. Cleaning products and abrasive materials will further diminish the coating and may scratch the glass.
Using connectors, ports, and buttons Never force a connector into a port or apply excessive pressure to a button, because this may cause damage that is not covered under the warranty. If the connector and port don’t join with reasonable ease, they probably don’t match. Check for obstructions and make sure that the connector matches the port and that you have positioned the connector correctly in relation to the port.
Lightning to USB Cable Discoloration of the Lightning connector after regular use is normal. Dirt, debris, and exposure to moisture may cause discoloration. If your Lightning cable or connector become warm during use or your iPad won’t charge or sync, disconnect it from your computer or power adapter and clean the Lightning connector with a soft, dry, lint-free cloth. Do not use liquids or cleaning products when cleaning the Lightning connector.
Certain usage patterns can contribute to the fraying or breaking of cables. The Lightning to USB Cable, like any other metal wire or cable, is subject to becoming weak or brittle if repeatedly bent in the same spot. Aim for gentle curves instead of angles in the cable. Regularly inspect the cable and connector for any kinks, breaks, bends, or other damage. Should you find any such damage, discontinue use of the Lightning to USB Cable.
Operating temperature iPad is designed to work in ambient temperatures between 32° and 95° F (0° and 35° C) and stored in temperatures between -4° and 113° F (-20° and 45° C). iPad can be damaged and battery life shortened if stored or operated outside of these temperature ranges. Avoid exposing iPad to dramatic changes in temperature or humidity. When you’re using iPad or charging the battery, it is normal for iPad to get warm.
If the interior temperature of iPad exceeds normal operating temperatures (for example, in a hot car or in direct sunlight for extended periods of time), you may experience the following as it attempts to regulate its temperature:
- iPad stops charging.
- The screen dims.
- A temperature warning screen appears.
- Some apps may close.
Important: You may not be able to use iPad while the temperature warning screen is displayed. If iPad can’t regulate its internal temperature, it goes into deep sleep mode until it cools. Move iPad to a cooler location out of direct sunlight and wait a few minutes before trying to use iPad again.
Identifying Devices
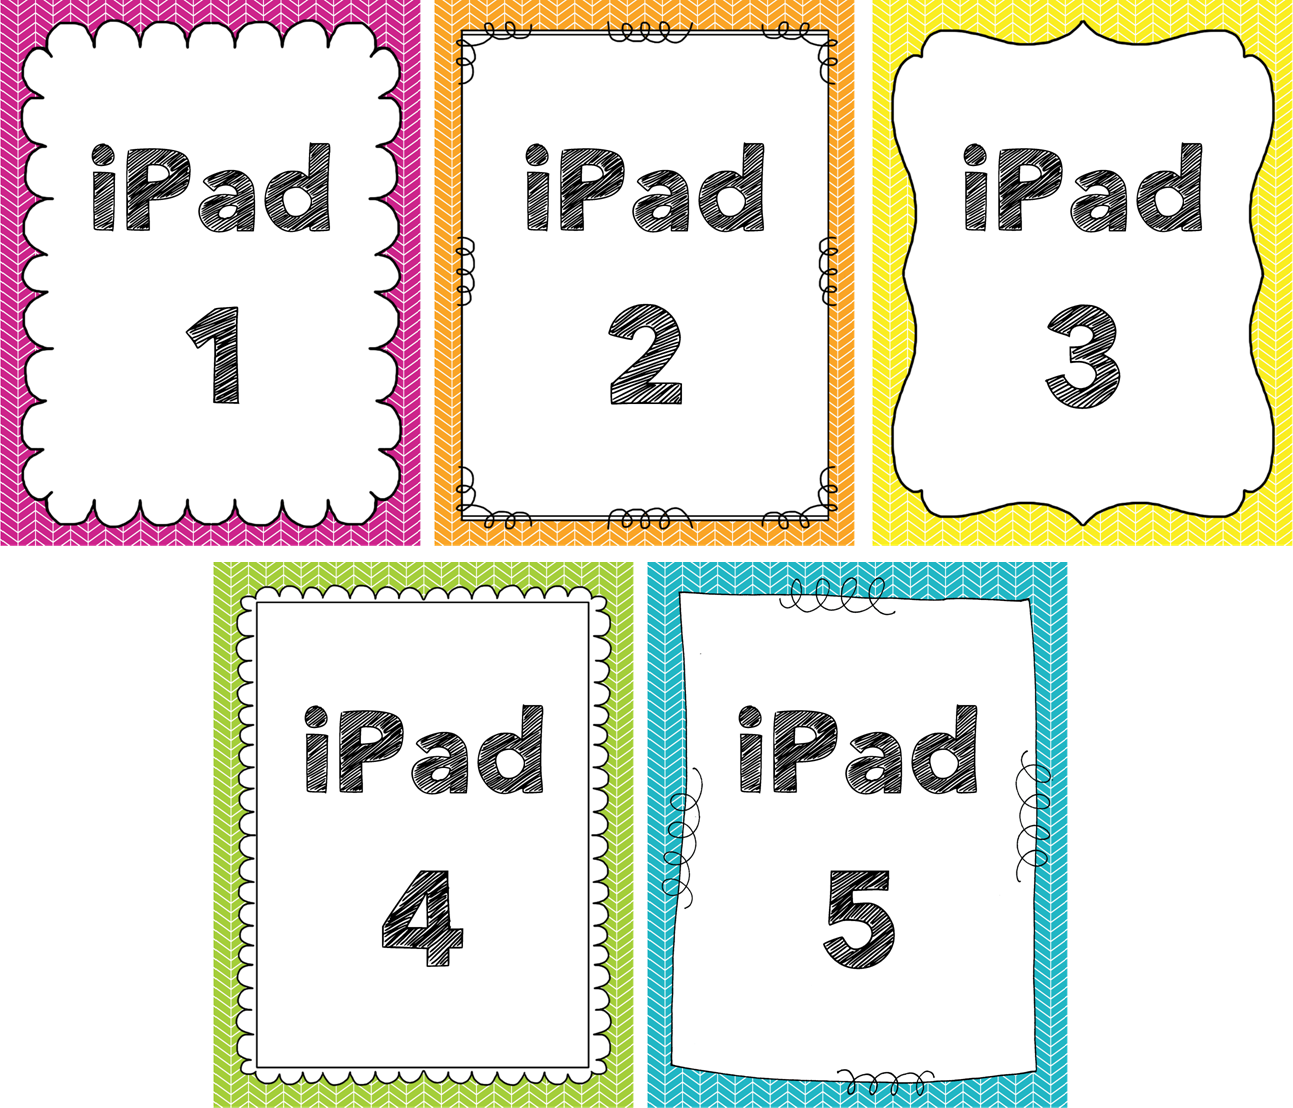
If a classroom has 1:1 devices, it may be beneficial to label the iPads for each student. This way, students can have ownership of the photos, videos, accounts, apps, and other information on the iPad. Here are some ways to label iPads in order to identify its owner:
Numbering: iPads can be numbered to match student classroom numbers. Students always use the number that is assigned to them. You may want to number the case and storage location of the iPad to make it easy to find for the student. Another option would be to set the background image to the assigned number. Students can do this by typing or drawing their number in notes, taking a screenshot, and then setting the screenshot as their background image.
Pictures: Have students take a selfie and set the background image to that picture of themselves. Once a student picks up an iPad, they can easily find who the iPad belongs to.
Table Groups: Storing devices by table groups will allow students to quickly locate their device.
Picture:FirstGradeKate