

General
General

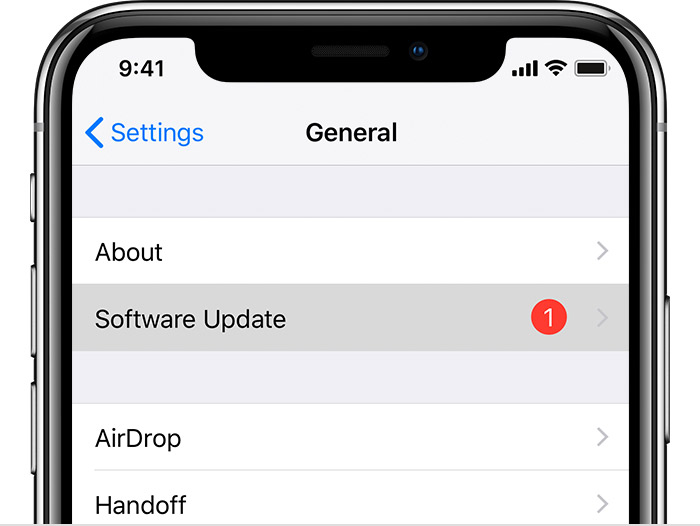
Need to know what version of iOS you are currently running?
Go to settings > general > about, and look for your current version.
Click here for more information about the differences between iOS operating systems.
Update iOS software on iPad
When you update the iOS software, your data and settings remain unchanged.
Note: Set up iPad to back up automatically, or back up your device manually, before you update.
Update iPad automatically
If you didn’t turn on automatic updates when you first set up iPad, go to Settings > General > Software Update > Automatic Updates, then turn on Automatic Updates.
iPad automatically installs updates wirelessly. You are notified before the update occurs.
Update iPad manually
Go to Settings > General > Software Update > Automatic Updates, then turn off Automatic Updates.
At any time, you can check for and install software updates. Go to Settings > General > Software Update.
Update using iTunes
Sync iPad using iTunes.
iTunes checks for available software updates each time you sync.

Switch between apps on iPad
Open the App Switcher to quickly switch from one app to another on your iPad. When you switch back, you can pick up right where you left off.
Open an app from the Dock
- Swipe up from the bottom edge and pause to reveal the Dock. Favorite apps are on the left side of the Dock, and suggested apps—like ones you opened recently and ones open on your iPhone or Mac—appear on the right side of the Dock.

- Tap the app you want to use.
Use the App Switcher
- To see all your open apps in the App Switcher, do one of the following:
- Swipe up from the bottom edge and pause in the center of the screen.
- Double-click the Home button.

- To browse the open apps, swipe right, then tap the app you want to use.
Swipe between open apps
Swipe right or left with four or five fingers.
To turn off the multifinger swipe gesture, go to Settings > General > Multitasking & Dock.
Your Apple ID is the account you use for just about everything you do with Apple—including storing your content in iCloud, streaming from Apple Music, and buying content from the iTunes Store, the App Store, and Apple Books. On your iPad, you can sign in to all Apple services with a single Apple ID and password. It’s best to have only one Apple ID.
Use iCloud to securely store your photos, videos, documents, music, apps, and more—and keep them updated across all your devices. With iCloud, you can easily share photos, calendars, locations, and more with friends and family. You can even use iCloud to help you find your iPad if you lose it.
iCloud provides you with a free email account and 5 GB of storage for your mail, documents, photos and videos, and backups. Your purchased music, apps, TV shows, and books don’t count against your available storage space. You can upgrade your iCloud storage right from iPad.
Note: Some iCloud features have minimum system requirements. iCloud may not be available in all regions, and iCloud features may vary by region.
Sign in with your Apple ID
If you didn’t sign in during setup, do the following:
- Go to Settings .
- Tap Sign in to your iPad.
- Enter your Apple ID and password.
If you don’t have an Apple ID, tap “Don’t have an Apple ID or forgot it?”
- If you protect your account with two-factor authentication, enter the six-digit verification code.
Change your Apple ID settings
Go to Settings > [your name], where you can do the following:
- Update your contact information
- Change your password
- Manage Family Sharing
Change your iCloud settings
Go to Settings > [your name] > iCloud.

Do any of the following:
- See your iCloud storage status.
- Upgrade your iCloud storage—tap Manage Storage > Change Storage Plan.
- Turn on the features you want to use, such as Photos, Mail, Contacts, and Messages.
Ways to use iCloud on iPad
Keep the following content up to date:
- Messages, Mail, Contacts, Calendars, Notes, and Reminders
- Photos and videos; see Use iCloud Photos on iPad
- Music, apps, and books
- Documents; see Use iCloud Drive on iPad
- Bookmarks, your reading list, and the webpages you have open in Safari; see Browse the web using Safari on iPad
- Passwords and credit cards; see Set up iCloud Keychain on iPad
- You can also do the following:
- View your iCloud data on iPhone, iPad, iPod touch, Mac, and iCloud.com (using a Mac or a Windows PC).
- Share your photos and videos with the people you choose. See Share photos from your iPad with Shared Albums in iCloud.
- Share your iCloud storage on plans with 200 GB or more with up to six family members. See Share purchases on iPad with family members.
- Locate iOS, Apple Watch, or Mac devices that belong to you or your family members. See Use the Find My iPhone app to locate your device.
- Find your friends and family; you, your friends, and family can share locations, follow each other, and see everyone’s location on a map. See Locate your friends and family from your iPad.
- Back up and restore your data. See Back up iPad using iCloud or iTunes.
Note: If you enable iCloud for apps such as Music, Photos, Calendar, and Contacts on your iPad, you can’t use iTunes to sync them with your computer.
Set the date and time
By default, the date and time, visible on the Lock screen, are set automatically based on your location. If they’re incorrect, you can adjust them.
- Go to Settings > General > Date & Time.
- Turn on either of the following:
- Set Automatically: iPad gets the correct time over the network and updates it for the time zone you’re in. Some networks don’t support network time, so in some regions iPad may not be able to automatically determine the local time.
- 24-Hour Time: (not available in all regions) iPad displays the hours from 0 to 23.
Add or change keyboards on iPad
You can turn typing features, such as spell checking, on or off; add keyboards for writing in different languages; and change the layout of your onscreen keyboard or Apple Wireless Keyboard.
If you add keyboards for other languages, you can type in two languages without having to switch between keyboards. Your keyboard automatically switches between the two languages you use most often. (Not available for all languages.)
Tip: On iPad Pro (12.9-inch), if you’ve added a Chinese, Korean, Japanese, or Hebrew keyboard, you can use the Caps Lock key to quickly switch back and forth between Latin script and the other keyboard you’re using.
Set typing features
You can turn on and off special typing features—such as spell check, auto-correction, and auto-capitalization—that assist you when you type on iPad.
- Touch and hold the globe or emoji, then slide to Keyboard Settings; or go to Settings > General > Keyboard.

- Turn off the special typing features in the list.
Add a keyboard for another language
- Go to Settings > General > Keyboard.
- Tap Keyboards, tap Add New Keyboard, then choose a keyboard.
Switch keyboards
- While typing text, touch and hold the globe or emoji.
- Slide your finger to the name of the keyboard you want to switch to.
Change the keyboard layout
- Go to Settings > General > Keyboard.
- Tap Keyboards, select a keyboard, then choose a layout.