


Designing Solutions
Overview
Seesaw is a web-based and application platform where students can post pictures from the classroom, annotate, speak their mind, and create electronic portfolios that connect school and home. Parents are able to see student work as soon as it is posted.
In this activity, students will take a common problem and use the design process to come up with a solution.
Learning Objectives
Students will:
- Be able to brainstorm problems they see at school.
- Be able to come up with solutions for those problems.
Vocabulary
Vocabulary Words:
- Problem: A problem is an unwelcome or harmful situation that needs to be solved.
- Solution: A solution is a way to fix a problem.
- Design: A design is a plan or protocol for carrying out or accomplishing something.
Pre-planning
To prepare for this lesson:
- Before the lesson, teachers must set up SeeSaw accounts for their classes and invite parents to join.
-
Please view the TEACHER video on using SeeSaw in the classroom.
-
Students should also know the basic features of SeeSaw.
-
Please view the following videos to decide how your students will access SeeSaw. Students can access it with email, a class code, or a QR code.
-
-
Teachers will need to have Playdough, straws, tape, popsicle sticks, and other builder materials available for the prototype part of the lesson.
Note:
- SeeSaw has many other tutorials on its website and Help Center.
- Decide which "design process" you will use with the students. Below in the STEPS, there is an example of one design process, there are many others available online by searching “design process.”
Accommodations
See the Accommodations Page and Charts on the 21things4students website in the Teacher Resources.
Steps
Directions for this activity:
-
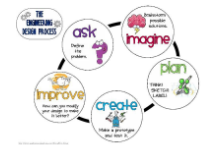
This lesson is meant as an introduction to the design process as defined in this picture.
-
Define the Problem:
-
Students start as a whole group discussing what a problem is and problems that they see in the classroom, around the school, or around the community.
-
For example, it is a problem that we always have dull pencils in the classroom or, there is too much trash in the hallways.
-
-
Imagine a Solution:
-
The teacher makes a list of these problems and tells students that today they are going to choose one of the problems and come up with a solution to that problem. (To make this task a little easier, all students could choose to come up with a solution for the same problem).
-
-
Create:
-
The teacher hands out a piece of paper to each student and asks them to draw how they would solve the problem they chose.
-
As an example, the teacher might say that it is a problem that the slides on the playground are always too hot for students to use.
-
-
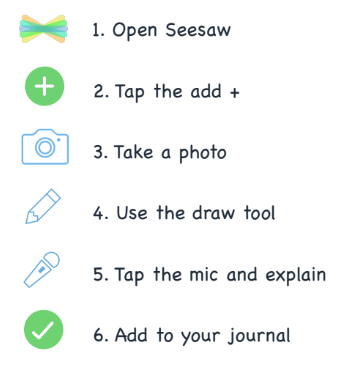
Once the students have their drawing, they will take a picture and post it to SeeSaw. The student can use the draw feature and microphone to help explain their solution.
-
Improve:
-
Students view others solutions on SeeSaw and talk to each other about how they could change or improve their design.
-
-
When students are happy with their design, they will build a prototype with the building materials.
-
For example, the student might use popsicle sticks and tissues to make an awning that would keep the sun off the slides mentioned earlier to keep the sun off the slides.
-
-
Students take another picture of their prototype and post it to SeeSaw. This time, they talk about how they came up with their solution and why they chose to build their prototype the way they did.
Assessment Options
Different options for assessing the students:
- Observations
- Check for understanding
- Teachers can see what students have posted to their journal from the Teacher side of SeeSaw. They are able to leave feedback for students and ask questions about their prototypes.
MITECS Competencies & ISTE Standards
MITECS: Michigan adopted the "ISTE Standards for Students" called MITECS (Michigan Integrated Technology Competencies for Students) in 2018.
Innovative Designer
4a. Students know and use a deliberate design process for generating ideas, testing theories, creating innovative artifacts or solving authentic problems.
4b. Students select and use digital tools to plan and manage a design process that considers design constraints and calculated risks.
4c. Students develop, test and refine prototypes as part of a cyclical design process.
Devices and Resources
SeeSaw works on all devices, but works best on devices with a camera.
Websites:
Get Students Started on Seesaw: Sign in with a code
CONTENT AREA RESOURCES
ELA
Students can write one-two simple sentences to describe their prototype.
Integrated Arts
The students can use their creativity to create the prototype. They could draw it ahead of time with crayons or markers.
Social Studies
Students come up with problems that impact their community and talk about ways to solve those problems.
CREDITS
This task card was created by Lacey Khon, KRESA, November 2018. Updated November 2023.