
Choosing the Application

There are many presentation applications available to choose from. There are applications that you can download on your personal computer or mobile device and there are online applications in the Cloud where you can create and store your presentation.
This independent learning unit is only going to touch on some of the more popular free ones available to educators. One of the goals of this unit is for you to create a presentation to use in your classroom. You are able to use a tried and true application that you have used in the past, but it is our hope that you will try out something new.
The most important thing though is to remember the purpose of your presentation! The purpose should drive which application you choose to use with your audience.
Below are several applications for you to learn about. There are tutorials, lesson ideas, and other tips and hints for each one.
Steps:
Think about your desired outcome and target audience.
You will see that some of these resources are also digital storytelling resources. Remember to consider your audience and the goal of your presentation. Do you plan to use a digital storytelling app, create a presentation to deliver instruction in your classroom, create something to share or embed in a course management system for virtual learning, to post on a webpage, to use as a tutorial, to model for your students to use, or for some other purpose?
In this section you will be opening your eyes to different options, before choosing one for your final activity.
Plan to spend at least 60 - 90 minutes in this exploration process.
Steps
- Take a quick look first at each application so that you are aware of the different features, tutorials and teaching resources provided (3-5 min max each)
- Then select one that seems interesting, but that you have not used before, and one that you may have used and want to learn more about.
- Watch a tutorial and/or look at the resources for each of your two choices.
Try two
- Create a short perhaps 3 slide or image presentation using your two different application choices to get a better sense of the environment for creativity and potential.
Reflect
- How are these applications different than your usual presentation application? Were there some new features you focused on?
- What are some of the advantages and disadvantages of the ones you tried out?
Adobe Creative Cloud Express
Cost/Audience: FREE (for teachers and students K-12)
Features: This is a very easy to use video and slideshow creation tool to communicate your message with a very professional look and feel. It is perhaps (editorial comment) one of the best in terms of graphic design. It is an app as well as web-based tool with nothing to download or install. You can create a Post to a social network, create a page. Templates, music, and photos are provided, just add your text, images, video (30 seconds), or voice. Publish as a video, share to social media, email the link, or save to your iPhone or Android camera roll as an mp4.
Adobe Creative Cloud Express Requirements:
- Teachers may obtain a free education account and provide individual student codes
- This complies with the school district COPPA and permission requirements.
- All content is owned by the school.
- An email account is required to sign up for an account.
Adobe Creative Cloud Express:
- How to create a video with Adobe Creative Cloud Express (once you have an account) (1:18)
- How to Create a Video with Adobe Express (10:38)
- A collection of short tutorials from Adobe
- Great short video by a student explaining How to install Adobe Creative Cloud on a Chromebook (4:35)
BlendSpace online lesson/presentation resource
Link: https://www.blendspace.com/lessons/
Cost: Free
Features: Blendspace is an online lesson/presentation resource that is perfect for flipping the classroom, project-based learning, and differentiated instruction. An educator can easily have an interactive presentation built in just minutes with links to websites and bookmarks, embedded videos, handouts, images, and text.
Mobile App: This is available as an app from either the App Store or Chrome Web Store
Tutorials: All you have to do is drag and drop the resources necessary to create your presentation. Watch this video tutorial for assistance in creating your first Blendspace. Using Blendspace in the classroom.
Canva
Link: https://www.canva.com/
Cost: Free basic account.
Features: Create designs for Web or print: blog graphics, presentations, Facebook covers, flyers, posters, invitations and more. This is an easy-to-use graphic design presentation tool with great template designs, drag and drop images, photographs, or use theirs. Very professional looking results with lots of template choices as well. The Free version shares them publicly on the web and provides a weblink to it, or you can download the presentation.
Fully optimized for Chromebooks and it is fully cross-platform.
Accessible content from Google Drive, Dropbox, Folders. Integrates with Google Classroom.
Students: Under 13 students can use Canva when supervised by an adult.
How to Use Canva for BEGINNERS! (<11 min, 2020)
Lesson Resources: Teaching Materials
EMAZE
Link: https://www.emaze.com/education/
Cost: Free tool to create presentations, websites, blogs, e-cards, or photo albums.
Features: Original and polished presentations that go beyond PowerPoint. A great collection of templates are included with the free version (gallery walk and newspaper are two examples).
Target audience: Adults and grades 9-12
Students: Free accounts don't protect student privacy and "user-generated content isn't always reliable or kid-appropriate" from Common Sense Media.
Emaze tutorial:
Lesson Plan Resources: 10 Lesson Plans for Grade 8 students
Google Slides
Link: https://www.google.com/slides/about/ or log into your Google account or Drive and select the application Slides.
Cost: Free
Features: Accessible on most computing devices and works with any browser. Create slide show presentations, can be output as a running presentation with timing, slides can be exported as images or to a .pdf document. Templates available include certificates and awards. Sharing and collaboration is easy by sharing it to another person with editing or only viewing rights. The presentation can be embedded into an online course or webpage. Easy to use. Can be used online or offline.
Tutorials: Two getting started Google Slide tutorials:
Full Tutorial (<17 min, July 2019)
Lessons Resources:
Elementary Grades
- Some ideas from: Two Boys and a Dad: How to Effectively Use Google Slides in Elementary Grades includes templates, character study, note taking, and digital notebook
- MiTechKids teaching lessons
- 1st grade: Guess Who game
- 2nd grade: See What I Learned and Presenting the Presentation
- 3rd grade: Publish a Story with Google Slides
- 4th grade: Publish a Partner Story
- 5th grade: Publish a Collaborative Research Paper
Middle School:
- 21things4students 4 Quests to learn Google Slides (create, insert, advanced features, present & publish)
Additional Resources:
- Article from Edublogger: Beginner's guide to Google slides in the classroom. This includes how to embed your presentation into blog posts and for remote learning.
- 30 Interactive Google Slides Activities for Classroom Excitement from Ditch that Textbook.
- How to Create Drag & Drop Activities with Google Slides (<20 min video, 2019)
- Slidesgo Free Google Slides and PowerPoint templates, including current holidays
- Slidescarnival Free Google Slides and PowerPoint templates
*How to use a template: Click on the “Use a Google Slides Theme” button to download this presentation for Google Slides. If you click on “Copy the presentation”, it will be saved on your Google Drive, where you can customize it and use it whenever you want
MICROSOFT POWERPOINT 365 & SWAY
URL: Microsoft Office 365 Student or Teacher
Cost: Free for sign up if you use a valid school email address to get stated.
PowerPoint Application: PowerPoint 365 is available as a downloaded desktop app, or accessed on the "waffle" when you sign into your online Microsoft account. There are some differences in the features between the desktop app and the online version.
Features: A powerful presentation program that has been a standard for a long time, and has recently received a lot of upgrades beneficial to education. The program can be used for storyboarding, notes, lessons, images, student portfolios, videos, to showcase and insert graphs and charts, create quizzes, and much more. You can save it as a video, pdf, or other formatted file, and embed it into a webpage or course management system. Templates, images, and music files are provided.
Share: You can share your presentation so others can join in editing it, allow commenting, and chat with others editing the file at the same time, or just share the link to the file for viewing it.
Translator: You can select text and then under the Review menu, select Translate, and choose a language to translate it into. Translator is built into Office 365 Excel, Word, and PowerPoint.
Office 365: Translate text into a different language.
Pre-Office 365: Using Microsoft Translator
Real-time Captions or Subtitles: Requires Microsoft PowerPoint 365
New features:
- A designer assistant that uses AI to suggest options and provide choices as you work. PowerPoint Designer
- An easier way to add animation through a Morph feature in the transitions menu. Morph effect tutorial for both online and desktop app
- Zoom allows you to access all of your slides during a presentation, found under the Insert menu. Select Insert>Zoom>Summary Zoom and then Insert. Zoom for PowerPoint
- Screenshot: Microsoft 365 has a new (2021) feature for the desktop app of PowerPoint that is not available for the web-based version.
- You can use the Insert menu to take a screenshot as shown in this image and
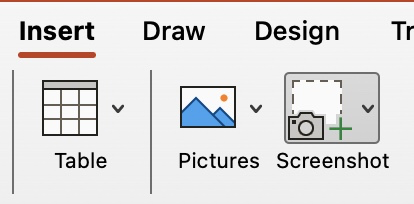 directly insert a screenshot from your screen.
Quick tutorials:
- Windows PC: PowerPoint Quick Start with Desktop version
- Mac: Office for Mac Quick Start Guides and Mac Help
- PowerPoint Animation Tutorial - Learn How to Animate
Classroom Resources:
Note: How to use templates: Click on the “Download a PowerPoint template” button located next to the template preview. The template will be saved on your computer, where you will be able to customize it
- Slidesgo Free Google Slides and PowerPoint templates, including current holidays
- Slidescarnival Free Google Slides and PowerPoint templates
- Middle school PowerPoint lessons in three Quests in 21things4students
SWAY
Link: Sway https://sway.office.com/
Cost: Sway is a free multimedia creation resource from Microsoft.
Features: It requires a free Microsoft Account to sign in. It is fairly easy-to-use to create content and stories to share or embed. Pre-designed layouts, designs and a storyline help you quickly create your content.
You can add videos, images, hyperlinks and text. Here are a few examples:
- View a student report "Newton's Laws in Ballet"
- 5th grader explains how to use Sway in the video below
Tutorials:
- Create, collaborate, seal the deal with Sway
- Windows Central tutorial page
- How to build a Presentation Part 2 in Sway (YouTube)
Lesson Resources:
The following resource, Pear Deck, is an add-on that has been receiving very favorable mentions from teachers using it as an interactive teaching and formative assessment tool. It is not a slide show application on it's own, but an add-on. It has been included below due to it's educational features that enhance student engagement through interactivity, increases participation, and provides formative data to the teacher.
Pear Deck add-on for Google Slides or PowerPoint Online
Pear Deck is an add-on for Google Slides, or for PowerPoint 365 only online. It adds interactive and formative assessments features. For the interactivity to work, it can be used during a live session online, or in a student self-paced mode online. The instructor has a dashboard to view student responses.
For Google slides:
Direct link to the YouTube video
Pear Deck for Distance Learning in the Music Room with Google Slides (10:48)
Getting Started with Pear Deck for Microsoft
01 Getting Started Video (2:51)
Looking to add it to PowerPoint Online
The next section of this unit focuses on design and presentation skills.
Move on to Create a Dynamic Presentation
Additional Presentation Applications
1. Kizoa - create beautiful shows, with music, effects and transitions
2. Zentation - synchronize video from YouTube with PowerPoint
3. Knovio - add video and audio to your PP presentations as well as .pdfs
4. Zoho Show - create, collaborate, present, broadcast and publish. There are themes, you can add charts, tables, videos, tweets, and use animations and transitions
5. Swipe - Turn your documents, lecture notes, videos, GIFs into a presentation. Drag files in and it turns them into slides and you can add a Polling slide. Free for 5 presentations
6. TouchCast studio for iPads is not free, but gives a full editing and recording suite, including green screen, with backgrounds and templates for your own newscast or classroom studio work
Working with a split screen showing two applications or windows
Split screen: A split screen is to have two different browser windows or applications open and arranged to be viewed side-by-side. Two-minute tutorials on how to split the screen for:
- Chromebook
- Mac
-
Hover your pointer over the full-screen button in the upper-left corner of a window. Or click and hold the button.
Choose ”Tile Window to Left of Screen” or ”Tile Window to Right of Screen” from the menu. ...
Click a window on the other side of the screen to begin using both windows side by side.
-
- Windows 10 how to split the screen
- iPad split view and app expose, and multitasking
-
Open an app.
Swipe up from the bottom of the screen to open the Dock.
On the Dock, touch and hold the second app that you want to open, then drag it off the dock to the left or right edge of the screen.
-
On-screen timers
Displaying a timer on your screen when presenting can be very helpful. Scenarios:
- You are showing something on a slide, and want to give them time to turn to a partner and discuss it, so you turn on the screen timer!
- You have set a time limit for student presentations, debates, or such, bingo - turn on a screen timer.
- They can count-down or count-up
Screen timers:
Free Templates for Google and PowerPoint
There are some Free slide templates available from:
Slides Carnival Free Templates - For the Classroom
Slidesgo templates for Google and PowerPoint
Rubric Resources
Two single point rubric examples
Rubrics from RubiStar
Read-Write-Think Oral Presentation Rubric
Making Learning Real - Scoring Rubric for Presentations
Nearpod for interactive slide presentations
Here are some great video tutorials
- Nearpod for Teachers: Everything you Need to Know in 20 minutes (20:31) 2022
- How to Use Nearpod tutorial 2021 (14:26) A Teacher Guide for Beginners
You can:
- Create your own presentations in Google Slides or PowerPoint.
- Explore the Nearpod library for tons of already created ones
- Nearpod & Zoom Integration
Then you add the Nearpod add-in to Google slides, OR upload your PowerPoint to a free Nearpod account.
Interactivity possible:
- Use it live with Zoom
- Send the link to students to use self-paced
Try this one: - Live Participation (in classroom or virtually)
Types of Interactions that can be run:
- Audio, BBC Video
- Collaborate board - like a cork board or white board
- Draw it
- Fill in the blanks
- Use with Flipgrid
- Matching pairs
- Memory test
- Open Ended Question
- Poll
- Quiz
- PhET Simulation
- Time to Climb game
- Video
- Web Content
- Slideshow