
Storytelling In Practice

You have had a chance to review aspects and features of storytelling, tell and record your own personal story, and have seen some examples of digital stories from a variety of content areas. This next section will focus on how storytelling can enhance teaching and learning.
Steps:
1. Take a look at the following “Storytelling for Online Teaching” resources and add some resources and notes to your Planning Document.
The eLearning Journal has a short online article, Useful Tips For Storytelling In Online Learning, that identifies:
- Three ways to use storytelling in online teaching to address issues encountered by students in online learning situations
- How to use storytelling to improve your online courses
- Reasons Why Storytelling Works in Education and how it is an effective tool in eLearning
- Eight ways stories make eLearning more engaging
An additional resource: "The Importance of Storytelling in eLearning"
2. It's time to dig in and create a story for a content area you teach. Do you need some ideas for your Content-Area Story?
Planning out your story using the following parts:
Part 1. Identify the subject and key idea
- Identify the content you will be teaching. Select a key idea that will get your audience interested. Think about a core question, a famous individual, some important event, or a discovery. Jot down details such as interesting facts, points, or issues to support the key content or subject you have chosen.
- Think of a hook to capture the interest of your audience, something that will be intriguing, a lead-in, interesting person, image, or mystery. Your audience may be adults, parents or students.
- Watch this short 3 minute video about capturing the attention of your audience. 7 keys of storytelling: Capture Attention (3:25)
Part 2. Create a Story Board or Map
- Create a short outline of your story, perhaps by using a storyboarding tool.
- Storyboarding is a very efficient and flexible way to plan out your story.
- You can use a presentation application such as Google slides or PowerPoint where you list one element for each idea per slide, that builds to your main point, and the ideas that will bring it down to a conclusion or action that you want your audience to take.
- A non-techie method is to use sticky notes on a large sheet of paper. Using a digital tool can be more effective when you begin to identify the supporting content, images, or text for each element.
- Additional digital tools: Create the storyboard with one key idea on each slide or in each cell. You can also use a free and easy graphic organizer such as bubbl.us or canva, or a Storyboard creator tool (such as https://boords.com/storyboard-creator ).
- If you wonder why one might use a story map, check out this resource from Reading Rockets.
TIP: Keep it short and to the point for a short 2-3 minute story.
Part 3. Conclusion
- Your conclusion or end of your story might lead to an assignment, a thoughtful discussion activity, or inspire some new learning. Remember to keep it short to match the attention span of your audience.
- Think of ways to make the ending inspire your audience with something to do, an action to take, some personal insight, or an ‘ah ha’ moment.
Multimedia or Digital Elements
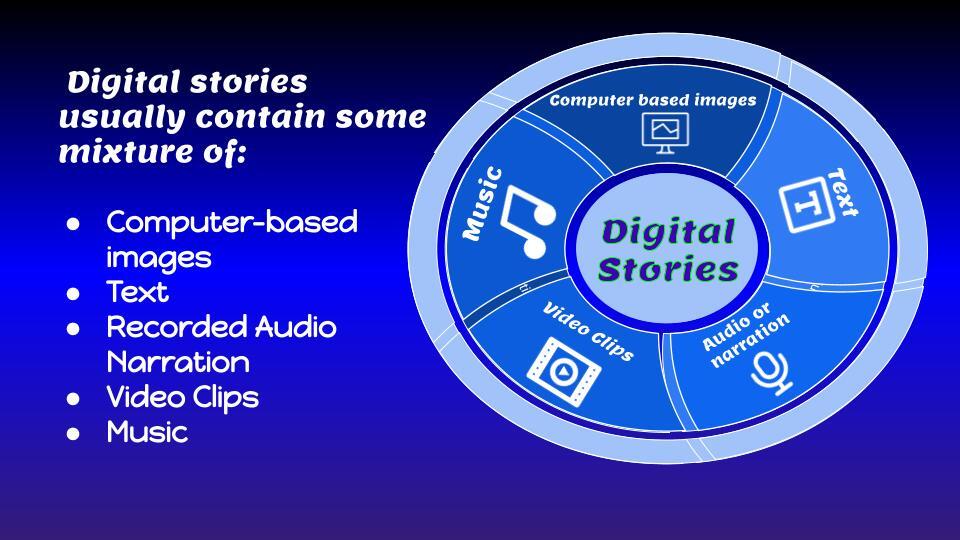
(Slide image from Empowering Students through Digital Storytelling)
- A digital story may include many of the elements in the chart above.
- Review your storyboard and think of media that could enhance your story (photo, video, musical elements, rhyme, rap, a word or question) that may play to emotional content.
- Add these ideas to your storyboard and media elements to the folder you created at the beginning of this learning unit.
Where to find free media resources?
- Start with your own photos or images.
- Look at the box on the right titled Media Resources.
Move on to Storytelling Applications
Media Resources
On-screen timers
Using a timer on your screen when teaching or telling your story can be very helpful
- You are showing something onscreen, and want to give students time to take notes or turn to a partner to discuss it when available!
- You have set a time limit for students to tell their stories, have online discussions, or such
- Timers can be set to count-down or count-up
Screen timers:
Rubrics & Related Resources
Two single point rubric examples
Additional Rubrics
- Sample digital storytelling rubric based on the work of teachers and Dr. Helen Barrett from the University of Massachusetts, Amherst.
- Rubrics from RubiStar
- Read-Write-Think Digital Story Rubric
- Schoolwires.net - Grading Rubric for a Student Digital Storytelling Project
21things4students Digital Storytelling Resources