
Garage Band
GARAGE BAND
Get Started with Garage Band
The first time you open GarageBand, you see the Sound browser, where you can choose a Touch Instrument to play. There are Touch Instruments for keyboard, guitar, bass, drums, strings, and more, designed to help you make music easily. In the Sound browser you can also open the Sound Library, where you can download additional Touch Instruments, sounds, and loops.
Choose a Touch Instrument
In the Sound browser, swipe left or right to view the instruments, and tap the one you want to play. Tap buttons in the lower part of the Instrument card to go directly to chord strips, notes view, scales, or tap More Sounds to see additional sounds for that instrument.
The Touch Instrument opens. To choose another instrument, tap the Browser button on the left side of the control bar to return to the Sound browser, then tap a different instrument.
Each Touch Instrument has a play area and a controls area. You play melodies, chords, and sounds by touching the keys, strings, or other elements in the play area, and change the sound of the instrument using the knobs, buttons, and other controls in the controls area.
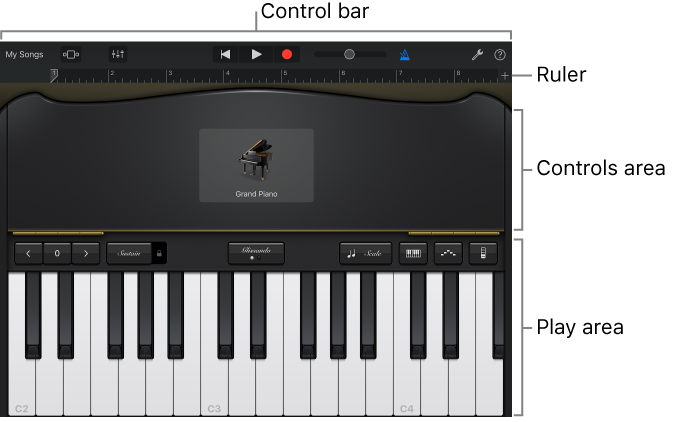
At the top of the screen is the control bar, featuring navigation, playback, and volume controls. Below the control bar is a ruler that shows musical time in bars and beats. The playhead moves across the ruler to show what part of the song is currently playing.
You can choose from any of the following instruments:
- Play the Keyboard
- Play sounds with the Sampler
- Play the Drums
- Play the Smart Drums
- Create drum patterns with the Beat Sequencer
- Play the Amp
- Record sounds with the Audio Recorder
- Play the Strings
- Play the Bass
- Play the Guitar
- Play the Pipa
- Play the Erhu
- Play the Guzheng
- Play the Koto
- Use Drummer
Record Sounds with Audio Recorder
Using the Audio Recorder, you can record your voice, an instrument, or any other sound using the microphone on your iPad, and play it back in GarageBand. You can also record sounds using an external microphone connected to your iPad.
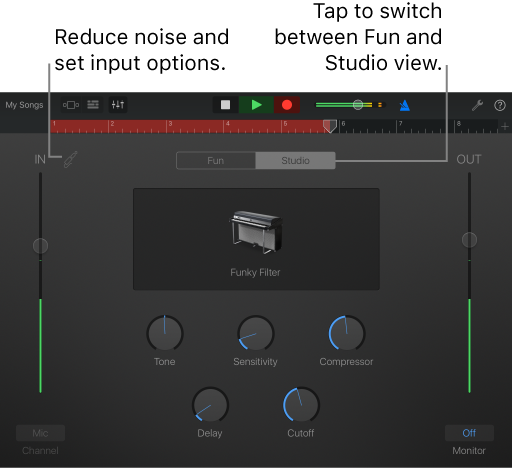
The Audio Recorder has two sets of controls you can use to change the sound. Fun view lets you quickly change the sound of your recording, while Studio view gives you more options to enhance your recording.
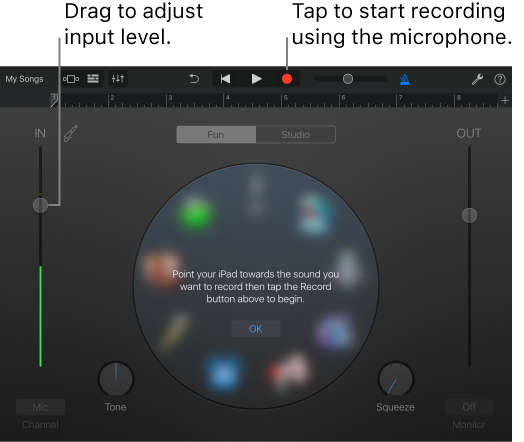
Switch between Fun and Studio view
Tap the Fun or Studio button at the top of the Audio Recorder.
Record a sound
Tap the Record button in the control bar.
Play, sing, or make sound into the microphone.
When you are finish, tap the Play button in the control bar to stop recording. Tap the Play button again to hear your recording.
Adjust the microphone input level
While you record, the In level slider on the left shows the input level from the microphone. If the level turns red, drag the slider down (or record the part again more softly) to prevent distortion.
- Drag the In level slider up or down to set the input level.
The In level slider is available if your iPad or input source supports input level control.
- If the input device supports left and right channels, tap Channel button under the In level slider, tap Input 1 or Input 2 to select the input channel, or tap Stereo to record in stereo.
Set the input level automatically
When an external microphone or other audio device (such as a headset or an audio interface) is connected to your iPad, the input level can be set automatically.
Tap the Input button , then tap the Automatic switch.
Reduce unwanted noise
You can use a noise gate to reduce low-level input noise when you record. A noise gate cuts off the sound when it falls below a certain minimum level.
- Tap the Input button , then turn the Noise Gate on.
- Drag the Noise Gate slider until the noise stops or decreases to an acceptable level.
Turn on monitoring for an external microphone
When an external microphone or other audio device (such as a headset or an audio interface) is connected to your iPad, the Monitor button under the Out level slider becomes active.
Tap the Monitor button to turn monitoring on. Tap the button again to turn monitoring off.
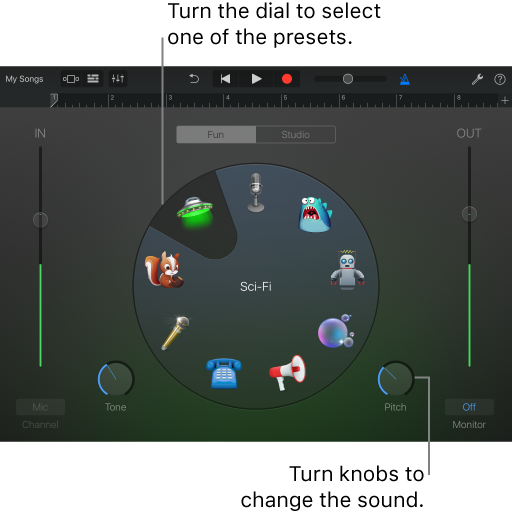
Change the sound using a preset
The Audio Recorder includes presets that appear after you record a sound. Each preset adds an interesting character to the recorded sound.
- Do one of the following:
- In Fun view, tap or turn the dial to select one of the presets.
-
In Studio view, tap the icon in the middle of the screen and choose a preset from the list.
- Turn the knobs to change the sound of the preset.
- You can try out different presets by tapping them and turning the knobs.
Set the key and scale for Extreme Tuning
The Extreme Tuning preset is a popular vocal effect that changes the pitch of your recording based on your song's key and scale settings. If the actual key or scale of your song differs from the key or scale setting, the effect might be less pronounced, or might change the pitch of individual notes in undesirable ways.
Tap the Song Settings button wrench, tap Key Signature, then tap a new key or a different scale (major or minor).
For more information on Garage Band, including sharing songs and using sound loops, please see the Apple Support Guide Below.
K-2 Using GargeBand

Students will use GarageBand to give a voice to their story.

Instructions
- Students will create a short story book with a beginning, middle, and end using Pages book template.
- Using the drawing feature in Pages students will illustrate their book.
- Students open GarageBand, and record themselves telling their story, making one recording for each page of their book.
- Split screen with GarageBand and Pages. Using drag and drop, drag the audio recording from GarageBand to the correct pages in the story.
- Export the project as an EPUB and send to Books.
- From Books tap sharrow and share to the teacher via Airdrop/Classroom/Email.
3-5 USING GARAGEBAND

Decipher a famous speech using GarageBand.

Instructions
- Students open Garage Band a choose a famous speech based on their current learning (i.e. Martin Luther King Jr.’s, “I Have a Dream.”)
- Throughout the speech, students split the clip to make stopping points.
- Using overlay with pages, students type how a part of the speech relates to today’s world.
- In pages, students put their text in “Teleprompter Mode.”
- While voice recording in Garage Band, students read their information from the pages teleprompter.
- When finished, students share their work to the teacher through Classroom/Airdrop/email.
6-8 USING GARAGEBAND

Change lyrics to a song to reflect learning.

Instructions
- Choose lyrics from a song using Safari and drag drop them into Pages.
- Change the lyrics to match a topic learned about in class.
- Use overlay to open the new lyrics and Garage Band at the same time.
- Using Garage Band, make a beat that matches your lyrics.
- Record the new lyrics over the beat in Garage Band while reading them from pages.
- When complete share their work with the teacher via Airdrop/Classroom/Email.
9-12 USING GARAGEBAND

Research how to make a quality podcast and record in Garageband.

Instructions
- Research best practices of how to create a podcast using Safari.
- Split Screen with Pages and record findings.
- After researching, create a script in Pages based on a topic of choice. Best practices that were researched should be followed when recording Podcast.
- Using overlay with pages and GarageBand, students record their Podcast. In Pages, students put their text in “Teleprompter Mode.”
- Create and add introduction, and outro audio
- Share and add a cover image and track information that represents your topic
- When complete share their work with your teacher via Airdrop/Classroom/Email.

The iPad offers many built in Accessibility tools that allow every student in your classroom to feel empowered and engaged. Here are a few ways you can reach all learners using these Accessibility Tools in your classroom:
So many students can create their own music with garageband and listen to it play over and over again.
- Voiceover can be used to access most of the Live Loops and Tracks
- Any student who loves music and can touch the screen of the iPad can play and record string instruments and drums with a little help from a peer.
- Many students are motivated to create complex songs with special effects to present a subject to the class in place of a book report.
- Create podcasts (audio files) to record books and narrative explanations
- Show audio waves to students to visually display loudness levels.