
iMovie

iMOVIE


iMovie Overview
In iMovie, projects can be either movies or trailers. The Projects browser displays all of your projects in one place, and it’s where you open your projects to edit, play, share, or delete them.
Create a Movie Project
With iMovie, it’s easy to create an exciting, professional-looking movie right on your iOS device.
You can assemble video clips and still photos, add music and sound effects, record a voiceover, and even apply filters or a theme to add a professional look and feel.
If you’re in a classroom setting and using an iPad set up as a Shared iPad, your projects are automatically stored in iCloud Drive rather than on the iPad itself.
Note: For educational institutions using Shared iPad, iMovie is designed to be used by students who are logged in to only one iPad at a time.
Create a movie
- From the Projects browser, tap the Create button , then tap Movie.
The Moments screen appears, showing your media organized into moments—all the photos and video clips from a particular day or event.
- Touch and hold image thumbnails to preview photos at a larger size or to play video clips.
- Tap the photos and video clips you want to include in your movie.
You can tap individual items or tap Select to choose an entire moment. Selected items appear with a blue checkmark icon .
Note: To view your video clips, photos, and albums in the media library, tap Media in the upper-left corner.
- Tap Create Movie (at the bottom of the screen).
Undo or redo an action
You can undo actions up until the last time you opened iMovie.
Do one of the following:
- Tap the Undo button .
- To redo the action, touch and hold the Undo Project Edit button, then tap Redo Project Edit.
- Shake your device and tap Undo Project Edit or Redo Project Edit.
Tip: If you’re creating a music video, you can add the music to your project first so that you can align video clips to it.
Open a Project for Editing
- To open the Projects browser, tap Projects at the top of the screen.
If you don’t see Projects at the top of the screen, tap Done or "X" until it appears.
- Scroll the projects, then tap one to see project details.
- Tap Edit.
Play a Project
You can play a project at any time to watch it from the beginning or to check your work in progress.
Do one of the following:
- If you’re working in a project: Tap the Play button The project begins playing from the playhead (the white vertical line) in the timeline. Tap the Pause button to stop playback.
- In the Projects browser: Tap a project to see the project details, then tap the Play Full Screen button . If you’re working in a project, tap Done to see the Play Full Screen button.
The project begins playing from the beginning. If the playback controls aren’t showing, tap the screen to make them appear. Tap Done (in the upper-left corner) to return to the project details screen.
Rename a Project
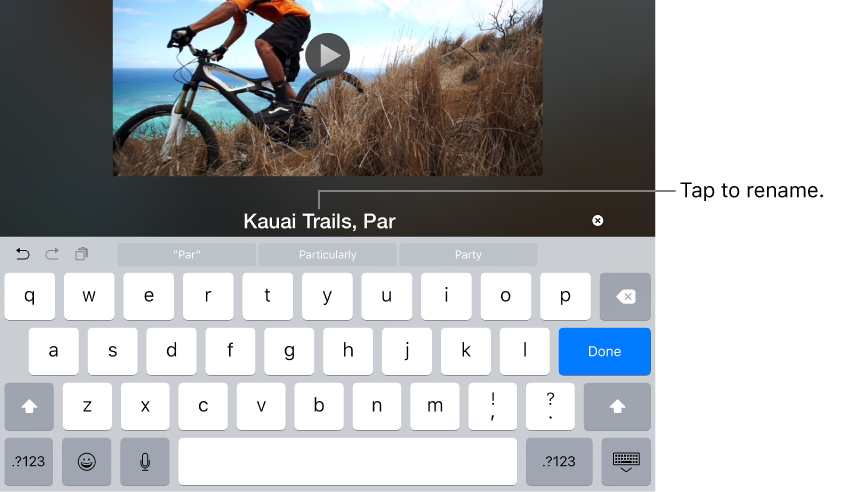
When you create a new project, iMovie assigns it a default name, which you can change at any time.
- To open the Projects browser, tap Projects at the top of the screen.
If you don’t see Projects at the top of the screen, tap Done or "x" until it appears.
- Scroll the projects, then tap one to see project details.
- In the project details screen, tap the name of the project; a keyboard appears.
- Tap the Clear button "x" to erase the entire name at once, or use the Delete key.
- Type a new name, then tap Done on the keyboard.
Share a Project
You can share a project or export its movie from the details screen.
- To open the Projects browser, tap Projects at the top of the screen.
If you don’t see Projects at the top of the screen, tap Done or until it appears.
- Scroll the projects, then tap one to see project details.
- Tap the Share button or "sharrow."
Choose the destination you would like to share your iMovie to.
Delete a Project
When you delete a project, any video clips recorded into iMovie for the project are still available for use in another project until you close iMovie. To keep the clips for future use, move them to the photo library. Photos taken into a project can’t be moved to the photo library.
Video clips that were embedded as part of an imported project are deleted after both the project and its copy imported from iTunes are deleted.
- To open the Projects browser, tap Projects at the top of the screen.
If you don’t see Projects at the top of the screen, tap Done or until it appears.
- Scroll the projects, then tap the one you want to delete.
- In the project details screen, tap the Trash button, then tap Delete Project (or Delete Trailer).
Duplicate a Project
You can duplicate a movie or trailer by sharing it to iTunes and then importing it back to the same device. You don’t have to use iTunes on your computer to do this.
- To open the Projects browser, tap Projects at the top of the screen.
If you don’t see Projects at the top of the screen, tap Done or until it appears.
- Scroll the projects, then tap one to see project details.
- Tap the Share button .
- Tap iTunes, then tap iMovie Project.
- When prompted, tap Keep Both to create a duplicate version of the project.
- The duplicate project has the same name as the original, with a version number appended (for example, Kauai Trail Biking 1).
- Tap Projects to return to the Projects browser.
- Tap the Import button , then tap iTunes.
- Tap the name of the project that you just shared to iTunes.
For more information on creating and editing videos, including voice over and transitions, please see the Apple Support Guide below:
K-2 USING IMOVIE

Students will use a script in Books, the Camera, and iMovie to create a book trailer.

Instructions
- Discuss with the class what theme from iMovie best fits their book based on genre
- Send students a script using Classroom (learninginhand.com/trailers)
- Open the script in Books and annotate the script
- Use the Camera to take pictures and video that align with the script.
- Open iMovie, choose a trailer theme and add titles, images, video, audio, transitions and more.
- When complete students share their work with the teacher via Airdrop/Classroom/Email.
3-5 USING IMOVIE

Students will create a school news broadcast.

Instructions
- Create jobs for groups of students. Example jobs, script writing, recorder/photographer, producer. Use only one iPad to do all parts or use Airdrop to send recordings to the producer’s device.
- Using Pages create scripts. An example script might include daily weather, lunch choices, school-wide announcements, birthdays, and interviews.
- Use Camera app to record the different portions of the news, and save them to the camera roll.
- Open iMovie, select “News Theme,” and add the video recordings from Media. Edit and add Filters, Titles, Audio/Music and other content as needed. Tap done when video is finished.
- Rename the project, and tap the sharrow. Save the video to camera roll or share to teacher via Airdrop/Classroom/Email.
6-8 USING IMOVIE

Students will compose a trailer based on a career.

Instructions
- Research a career that sounds interesting.
- Note different facts about that career in Notes (i.e. schooling, training, salary, uniforms, etc.)
- Using iMovie, add the research into the trailer script.
- Use safari to add images, take your own images, or record video to match the information.
- When finished, share your work to the teacher through Classroom/Airdrop/email.
9-12 USING IMOVIE

Students will create an infomercial about a topic learned in class.

Instructions
- Use safari to view infomercial and look for common characteristics.
- Create an outline for an infomercial in Pages to teach someone a topic based on previous learning.
- Record video and take photos that accompany your information.
- Compile all pieces together into an iMovie.
- Add music, change the speed of clips, add transitions and titles, and voiceover your information using your script.
- When finished, students share their work to the teacher through Classroom/Airdrop/email.

The iPad offers many built in Accessibility tools that allow every student in your classroom to feel empowered and engaged. Here are a few ways you can reach all learners using these Accessibility Tools in your classroom:
Some great ideas to use videos with students who have special needs are:
- Video students as they model appropriate behavior. Insert pictures of the student along with text stating the behavior in iMovie. They can watch the videos later to reinforce the behavior.
- Let student create videos to show their understanding of key concepts, collaborating with other students so everyone uses their strengths. Use iMovie to add pictures of the team and text to highlight key concepts they are showcasing in the video.
- iMovie allows Voiceover (for students with low vision) and Switch Control (for students with physical impairments) to edit movies.