
QGS4 Google Slides: Insert
Introduction
This Quest focuses on using the features of the Insert menu as you work on your own and then apply some of the features to your group, partner, or individual class presentation. You will find practicing the skills with your own slide deck first will give you some great ideas for making your slide(s) in the Group Presentation look more professional. Video tutorials have been provided to help you with the different features, and be on the lookout for any extra features you figure out in the process.
I Can Statements
- create a presentation with the inclusion of content inserted to enhance a presentation
- know how to apply advanced features (including a text box, shape, photos, or images) to a slide presentation using slide Insert menu features
- be able to apply many of these features to other Google applications
- share and collaborate with others
Key Vocabulary
Citation: A citation is a written reference to a specific work (book, article, dissertation, report, musical composition, etc.) by a particular author or creator which identifies the document in which the work may be found.
Diagram: A diagram is a simplified design or drawing that shows arrangements, or relationships between things, such as a family tree or organization chart.
Hyperlink: A hyperlink is text or an object linked to a specific web site, object online, or to another location on a slide, or an external file.
Insert: Insert is a menu item in the application used to add a shape, image, photo or object onto a slide.
Mask an image: To mask an image is the action of using a shape to mask part of a photo or image on the slide.
Shape: A shape is an element or figure that can be that can be added onto a slide.
Text box: A text box is a rectangular area on a slide where can type text or images and objects.
WordArt: WordArt is the name for text that has a decorative or outlined effect.
Vocabulary Game
Play the interactive Quizlet Game: Direct link
Steps
1. Take this Challenge 16 to check and make sure you are familiar with the Insert features. These skills are demonstrated in the videos for each Challenge section below.
- Challenge: Make a copy of this 11.QGS4 Practice Google Slide Deck and complete each task highlighted on the slides successfully as proof of your skill.
2. After completing the Challenge 16, check with your teacher about sharing or submitting it.
3. Reviewed the two additional resources located on the right:
- * Free image resources for your presentation
- * Research Resources and Citation help
4. Worked with my partner or group on our Group Presentation, researching content to add, and inserted media and other elements to our assigned slide(s).
- Added at least one hyperlink to a site used for the information
- Added an image or video
- Cited the sources for the images and content
5. Shared our progress on our Group Presentation with the teacher.
Challenge: Insert an Image, Apply a Mask, and Insert and format Text boxes
This video demonstrates how to complete the first 3 challenges:
- insert images
- use Explore to search for images to insert
- how to mask an image inside a shape
- insert text boxes
- change the font, color, fill color, overlap, and group them
BONUS:
How to make the background of an image transparent:
- Right-click on an image and click Format options. ...
- Click on Adjustments. ...
- Adjust transparency and view the result. ...
- Select the shape. ...
- Click on Fill color and select Transparent. ...
- View the overlapped text. ...
- Click on the Reset button in the Adjustments tab.
Challenge: Insert Audio and Video
This short video will demonstrate inserting audio from an .mp3 file and locating and inserting a video.
- We demonstrate recording your own voice using a free tool like online-voice-recorder.com and then upload the .mp3 recording to your Drive space.
- Inserting a Video in Google Slides:
- There are three main options: add/embed a video directly from YouTube, from your Google account, or an outside source URL.
- Locating an appropriate video to insert is located at 3:29 on the recording below.
- 4 ways to insert videos onto a Google slide is located below this one.
4 Ways to Insert Videos onto a Google Slide
Challenge: Insert a Table, Chart, and Diagram
This video demonstrates inserting Tables, Charts, and Diagrams you can edit and fill in,
Direct link to the video. (16:17) with bookmarks to different features.
Challenge: Insert, fill, rearrange, and rotate Shapes, WordArt
This video demonstrates how to insert Shapes that you can fill with color, format the line color and size, rearrange and rotate them, and insert WordArt.
Challenge: Insert lines, scribbles, special characters, emojis, and hyperlinks
This short video demonstrates how to insert and format lines including the scribble, add special characters that include emojis, and hyperlinks to web sites and other slides in the presentation.
Completing this Quest
Check with your teacher:
- when you have completed the Challenge activities.
- understand many features of the Insert menu
- worked on the Group Presentation
- have inserted some images or other media, and content on your assigned slide(s).
- inserted a citation and/or hyperlink to resources used
- reviewed the I Can Statements before you move on to the next Quest.
- shared our progress with the teacher
Check off this Quest on the 21t4s roadmap
Ready for Quest QGS5 Advanced Features
Additional Resources


* Free Image Resources for Your Presentation
When you do your research for images, you will need to look for public domain images.
-
Pixabay is a great site for free images. Note: Do not use the top row as they are Shutterstock images and there is a fee to use them.
-
Pics4Learning is a curated image library that is safe and free for education.
-
Photos For Class are properly attributed, Creative Commons photos for school.
-
Iconfinder provides beautiful icons to millions of designers and developers. Type in the name of the clipart or icon you are searching for, then select ALLOWED FOR COMMERCIAL USE for images that are free to use.
-
You could also take your own pictures. Remember not to include people in your pictures unless they are over 18 and they have given their permission.
-
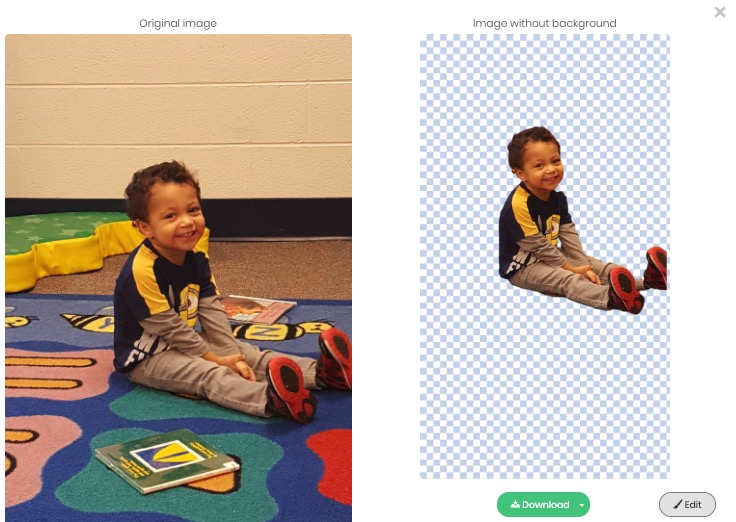
You can use the website remove.bg with a photo of yourself or family member (with permission) and remove the background of the photo to create a photo of the person that can then be downloaded and inserted on a new background. Example:
Please remember: If you are using pictures you must cite the image properly:
* Research Resources & Citation help
If you are in a Michigan school you may use databases from MeL (Michigan Electronic Library). Most schools in Michigan have a direct link to MeL from their school media center. Great databases to choose from are Britannica School, Opposing ViewPoints, and Explora Middle School.
Note: If you live in a state other than Michigan, check your state or school library for similar databases.
You may also use the sites below for your research:
Citations: When you do research, the information that you use must be cited properly. You can use any of the examples below to cite your work:
-
Citation Machine (Click on CMachine after reading the instructions)
Competencies & Standards
MITECS Michigan Integrated Technology Competencies for Students, and
1. Empowered Learner
a. Articulate and set personal learning goals, developing strategies leveraging technology to achieve them, and reflect on the learning process itself to improve learning outcomes
b. Build networks and customize their learning environments in ways that support the learning process
c. Use technology to seek feedback that informs and improves their practice and to demonstrate their learning in a variety of ways
d. Understand the fundamental concepts of technology operations, demonstrate the ability to choose, use and troubleshoot current technologies and are able to transfer their knowledge to explore emerging technologies
2. Digital Citizen
b. Engage in positive, safe, legal and ethical behavior when using technology, including social interactions online or when using networked devices
c. Demonstrate an understanding of and respect for the rights and obligations of using and sharing intellectual property
3. Knowledge Constructor
c. Curate information from digital resources using a variety of tools and methods to create collections of artifacts or solving authentic problems
6. Creative Communicator
a. Choose the appropriate platforms and tools for meeting the desired objectives of their creation or communication
b. Create original works or responsibly repurpose or remix digital resources into new creations
c. Communicate complex ideas clearly and effectively by creating or using a variety of digital objects such as visualizations, models or simulations
d. Publish or present content that customizes the message and medium for their intended audiences
7. Global Collaborator
a. Use digital tools to connect with learners from a variety of backgrounds and cultures
b. With guidance from an educator, students use technology tools to work with friends and with people outside their neighborhood, city and beyond
c. Contribute constructively to project teams, assuming various roles and responsibilities to work effectively toward a common goal
Websites and Documents
Websites
- Bibme
- BrainPop - Geography
- Citation Machine
- iconfinder
- Michigan eLibrary
- Online Voice Recorder
- Photos for Class
- Pics4Learning
- Pixabay
- Pure Michigan
- Remove.bg
- TeacherVision Guide to Citing Internet Resources
- World Fact Book
21t4s Videos
- Introduction Video (50 sec)
- Insert Intro Video (0:57)
- Insert an Image, Apply a Mask, and Insert and format Text Boxes Video (6:13)
- Insert a Table, Chart, and Diagram Video (16:17)
- Insert, fill, rearrange and rotate shapes, and WordArt Video (15:46)
- Insert lines, scribbles, special characters, emojis, and hyperlinks Video (15:29)
- Four ways to insert video on a Google Slide Video
21t4s Documents or Quizzes