

QM3 Create & Insert
Introduction
Now that you have worked on your Presentation Planning Document, and have selected your topic, use these tutorials to help you build your skills and add features to your presentation. We suggest you create a blank presentation to practice with, and then decide if you want to add some to your own presentation, or work with your partner or group to decide on the most effective ones to support your message or topic.
I Can Statements
- create a PowerPoint presentation
- apply a Theme for a presentation
- select a layout for a new slide
- change the background of a slide
- understand and use some Insert Menu features
- know how to collaborate with others on a presentation when working with others
Key Vocabulary:
Design: Design is a professionally designed ideas and layouts that can be applied to a slide or entire presentation to improve the visual appearance of it.
Handles: Handles refers to the sizing handles that appear around an image that let you resize and rotate the object selected.
Preview in the Desktop app: Preview in the Desktop app is the action that lets you see how the presentation or a slide will look before completing and saving it.
Ribbon: A ribbon is a long strip of tabs with buttons across the main window in PowerPoint.
Slide Background: Slide background is initially a plain white, but can be changed to a solid color, gradient color fill, a texture or pattern, or a photo or image. Note that a "Theme" you apply may override individual slide backgrounds.
Slide Layout: A slide layout is the way your text and images are arranged on a slide. Applying a "Theme" may change the layout of the slides.
Tabs: Cabs are a collection of tools such as Insert, Draw, Design, Animations that can be used in creating a presentation.
Theme: A theme refers to a design theme that makes it easy to coordinate your PowerPoint presentation with colors, graphics, and fonts that all work together to create a mood for your presentation. Default themes are provided in the program.
Thumbnails: Thumbnails are miniature images of slides in a presentation.
Tools: Tools are features in the PowerPoint program that help you apply an action, such as inserting images, shapes or videos, and adding effects to objects on a slide.
Vocabulary Game
Play the interactive Quizlet Game: Direct Link
Steps
1. You may already be familiar with PowerPoint, but this is a great opportunity to learn more by going through the activities in this Quest.
Note: If you and your partner or group members are already very familiar with how to apply and use each of the features listed in the vocabulary section, then take turns demonstrating them to each other before proceeding to the last section on this page titled: Working on Your Presentation.
2. There are two different introduction videos for Microsoft PowerPoint for this Quest, one for those that use Microsoft 365 Online in a web browser, or those that use the Microsoft PowerPoint Desktop App .
Note: There are bookmarks for different parts in the video.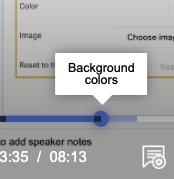
Look for bookmarks that are shown as you move your cursor along the timeline and look for a small black square, something like this image shows, and it will display the subtitle for that part of the video at each bookmarked point.
Special Note (check with your teacher): If you and your partner or group already know how to use each of the features listed in the Vocabulary section, then you may be able to proceed directly to the *Working on Your Group Presentation."
List of PowerPoint skills to know and try out that are shown in the Introduction videos :
- Title and subtitle
- Add a new slide and layout options
- Themes
- Background Color choices
- Background Image choices
- Additional Background Options
- Insert Pictures, Shapes, and Images: resize, rotate, and overlap
Introduction Video: PowerPoint in the Web Browser
Directions:
- Create a blank PowerPoint presentation
- Watch the video below and pause it as needed to try out each of the features shown and listed below the video.
- Use the bookmarks to return and replay one of the sections.
Direct link for those logged into Microsoft 365 and using PowerPoint in the Web Browser Intro Video 8 mins (8 min) Embedded above.
List of PowerPoint skills to know and try out that are shown in this Introduction video:
- Title: Once you open your blank presentation you have a Blank Title Slide. Give it a name, that identifies your topic, or if this is just for practice name it Q3practice.
- Add a new slide - Use the Insert menu and New Slide
- Theme - Return to the first slide. Themes may be showing on the right-hand side, if not, select Theme on the sub-menu to display them. Scroll down and select one to see what it looks like, use the undo arrow and select a different one.. Some Themes will also impact other slides. Use Undo again so that no Theme is applied at this time.
- Background Color: Select Background on the sub-menu bar. The first choice is Color. Try Color and Gradient and use Undo and try different ones. If you select the option to apply it to the Theme, it will then make all new slides have the same background. Experiment with this knowing you can undo until you like one.
- Background Image: Use the Background choice and select Choose image. Then select Google Image Search and type in a word that might apply to your group topic. When you click on an Image you want, select Insert to see it applied to the slide. Consider whether an image in the background will distract from your message, or draw the attention of the audience.
- Background Options: Notice that you can upload images or photos, take one with your attached camera if enabled, upload one from one of your Google Drive collection of photos or images ( .gif, .jpg, or .png file types).
- Insert Pictures: Add one or two images, resize, rotate, and overlap them.
Introduction Video: PowerPoint in the Desktop App
Directions:
- Create a blank PowerPoint presentation
- Watch the video below and pause it as needed to try out each of the features shown and listed below the video.
- Use the bookmarks to return and replay one of the sections.
List of PowerPoint skills to know and try out that are shown in this Introduction video:
- Title: Once you open your blank presentation you have a Blank Title Slide. Give it a name, that identifies your topic, or if this is just for practice name it Q3practice.
- Add a new slide - Use the Insert menu and New Slide
- Theme - Return to the first slide. Themes may be showing on the right-hand side, if not, select Theme on the sub-menu to display them. Scroll down and select one to see what it looks like, use the undo arrow and select a different one.. Some Themes will also impact other slides. Use Undo again so that no Theme is applied at this time.
- Background Color: Select Background on the sub-menu bar. The first choice is Color. Try Color and Gradient and use Undo and try different ones. If you select the option to apply it to the Theme, it will then make all new slides have the same background. Experiment with this knowing you can undo until you like one.
- Background Image: Use the Background choice and select Choose image. Then select Google Image Search and type in a word that might apply to your group topic. When you click on an Image you want, select Insert to see it applied to the slide. Consider whether an image in the background will distract from your message, or draw the attention of the audience.
A background image can be applied to the Theme, repeating it on each slide when or if it makes sense.
- Background Options: Notice that you can upload images or photos, take one with your attached camera if enabled, upload one from one of your Google Drive collection of photos or images ( .gif, .jpg, or .png file types).
- Insert Pictures: Add one or two images, resize, rotate, and overlap them.
- Screenshot: Microsoft 365 has a new (2021) feature for the desktop app of PowerPoint that is not available for the web-based version.
- You can use the Insert menu to take a screenshot as shown in this image
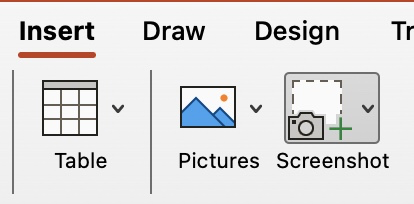 to insert an image from your screen.
Working on Your Presentation
3. Once you tried out the different features shown in the video, get started working on your topic presentation.
- If you working with a partner or group then reaching consensus on an appropriate design for the group presentation that promotes or supports your message or topic is important.
- Take time to identify the slides each will be responsible for by adding their initials in a corner of the slides or in the speaker notes.
Decisions
- Be sure to add a title to your presentation
- Decide if you want to use a Theme, background color or image, or make use of a Designer suggestion for your presentation.
- Add a subtitle on the first slide for your name(s)
- Add additional slides for your Introduction, one for each point to support your topic or message, a conclusion or ending slide, and a final one for questions or feedback and to thank your audience. You can add more later as needed.
Additional PowerPoint Resources
Completing this Quest
You are working on a project as a team, but you are still responsible for your slides. Make sure you uphold your part of the bargain! Review the I Can Statements before you move on to the next Quest.
Check off this Quest on the 21t4s roadmap
Ready for Quest QM 4 Advanced Features
 11.QM3 Student Checklist (docx)
11.QM3 Student Checklist (Google Doc)

11.QM3 Teacher Guide (docx)
11.QM3 Teacher Guide (Google Doc)
Competencies & Standards
MITECS Michigan Integrated Technology Competencies for Students, and
1. Empowered Learner
a. Articulate and set personal learning goals, developing strategies leveraging technology to achieve them, and reflect on the learning process itself to improve learning outcomes
b. Build networks and customize their learning environments in ways that support the learning process
c. Use technology to seek feedback that informs and improves their practice and to demonstrate their learning in a variety of ways
d. Understand the fundamental concepts of technology operations, demonstrate the ability to choose, use and troubleshoot current technologies and are able to transfer their knowledge to explore emerging technologies
6. Creative Communicator
a. Choose the appropriate platforms and tools for meeting the desired objectives of their creation or communication
c. Communicate complex ideas clearly and effectively by creating or using a variety of digital objects such as visualizations, models or simulations
d. Publish or present content that customizes the message and medium for their intended audiences
7. Global Collaborator
b. With guidance from an educator, students use technology tools to work with friends and with people outside their neighborhood, city and beyond
c. Contribute constructively to project teams, assuming various roles and responsibilities to work effectively toward a common goal
Websites and Documents
Websites
- Basic Tasks for Creating a PowerPoint Presentation- Microsoft Support
- GCF LearnFree PowerPoint Tutorials
21t4s Videos
21t4s Documents & Quizzes